Update April 2015: The SSL proxy handling in Charles 3.10 has been improved so this guide is no longer necessary. Charles now creates a root SSL certificate on each computer it is running on instead of using the same certificate on all computers. This means that it is no longer necessary to create your own certificate manually.
Charles Web Proxy is an excellent tool for debugging HTTP requests. It has support for inspecting requests/responses and even more cool features like breakpoints or rewrites. I use it when developing iOS apps that communicate with a server over HTTP but also to figure out how my favorite apps from the App Store works. The Charles documentation is a good resource for understanding the features in Charles.
HTTPS
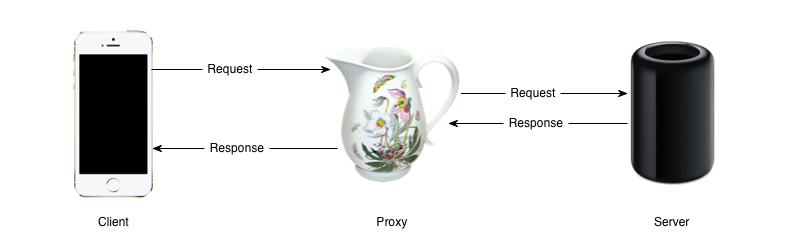
Support for SSL proxying is built into Charles using man-in-the-middle HTTPS proxy. It is incredibly useful as many apps use HTTPS. Instead of the client seeing the certificate of the server it sees a certificate Charles has signed with its own root certificate. Further Charles communicates with the server using the certificate of the server. In this way the client thinks it is communicating with the server and the server thinks it is communicating with the client, while they are in fact both talking to Charles.
However, since the certificate provided by Charles is not signed by a trusted certificate authority, the client will in most cases reject it. To avoid this you have to add the root certificate of Charles as a trusted certificate on the client. There are both instruction how to do that for Mac/PC and iPhone.
Security problem
Installing the root certificate of Charles as a trusted certificate on your device however introduces security threats. An evil-minded person could simply use an SSL certificate signed with the root certificate of Charles to perform a man-in-the-middle attack on your device, since this certificate and its key is available for everyone to download on the internet.
Custom SSL certificate
Luckily Charles supports using your own custom SSL certificate as the root certificate, which you have to create yourselves. This can be done using openssl. You will be asked some information about the certificate. I recommend at least setting Organization Name to something meaningful as for instance Charles Proxy Custom SSL certificate. This makes it easier to find the certificate in Keychain.
1
| |
An X.509 certificate and a private key will be created. Charles expects a PKCS12 file where these are bundled together. So lets create such a bundle. You will be asked for a password and you must specify one for Charles to accept the bundle. Further every time Charles is launched you will be asked to type in this password. In the end of this post I will show how to avoid this.
1 2 3 | |
Now simply select the charles.pfx file in Proxy Settings SSL Use a Custom CA Certificate in Charles. Notice that Charles only saves the path to the file, so place the file somewhere meaningful.
Remember to install the certificate in keychain by simply opening the charles.crt file. It can be installed in the iOS simulator by dragging the charles.crt into the simulator window and on your iOS device by sending it using email. Remember to delete the old Charles certificate if you had it installed.
Replace default certificate
Charles is now using our custom SSL certificate and we can be happy and feel secure. However, if you like me use Charles on a daily basis you will quickly get annoyed by having to provide the password of the PKCS12 bundle every time you launch Charles. My method to avoid this is to trick Charles into thinking that it is using the default Charles CA certificate when it is actually using my custom certificate.
Charles stores the used certificate in a keystore file located in a jar file. The trick is to create a new keystore file with our custom certificate and then replace the file. We use keytool to make the keystore file from the charles.pfx file. The file is protected by a password, and it is important that we use the same password as the keystore file bundled with Charles. A quick inspection of the Charles jar file reveals that this password is expected to be Q6uKCvhD6AmtSNn7rAGxrN8pv9t93.
1 2 3 4 | |
This will generate a keystore file. The private key stored is still protected by key provided when it was created. This must be changed as well to the key Charles expects.
1
| |
The last thing to do is to replace the default keystore file with the new generated one, which is located inside the charles.jar file.
1
| |
Remember to disable Use a Custom CA Certificate in Charles. Charles is now using your custom SSL certificate and you don’t have to type in a password every time you launch Charles.